Thursday 27 June 2013

Banana bread

I haven't posted for a while as I've had a bit of a crisis thanks to my adorable little monster Bruce the Whippet. I must have left the room for all of 5 minutes and when I came back I find that he has almost chewed right through my laptop power cable! ...luckily it was not plugged in though. So that was completely useless after that leaving me with a mere 30% battery! The replacement cable arrived today but I have been totally lost without my computer all week. I actually made this banana bread at the weekend, with the intention of posting it on Monday but due to unforseen dog induced circumstances here it is now.

I absolutely love banana bread and it is by far the thing that I make the most in our house. A staple. We eat it by itself or with jam or chocolate spread or toasted with butter (how the Ozzies eat it I discovered when I took a trip the other year), for breakfast or a snack. Never underappreciated. It is so easy to make and is a proper comfort food.


Ingredients
(makes 1 loaf)

250g self raising flour
150g golden caster sugar
100g butter melted and cooled
2 eggs, beaten
3 ripe bananas (I always say the trick is if your fingers go through the skin they have been left too long, you want them to be speckled brown and yellow)
100g chopped walnuts
1 tsp vanilla essence

Preheat your oven to 180°C (or 350°F/gas 4) and line a 900g loaf tin with greaseproof paper and butter (you can buy these ready sized so I just get those for ease - you don't even need to grease it with butter).

Melt the butter in a sauce pan then leave to cool for a few minutes.

In a large mixing bowl combine the flour and sugar then add the melted and cooled butter, the beaten eggs and the vanilla extract.

Roughly mash the bananas with a fork, not too much though there should be lumpy bits and mix in with the rest of the mixture. Add the chopped walnuts and stir until combined.

Transfer to the prepared tin and spread out evenly then bake for 50 minutes (I check after 45 and if a skewer comes out clean it is ready, if not return to the oven for another 5-10 minutes).

Cool in the tin for 5 minutes then transfer to a cooling rack to cool completely. If you try to cut it before it is cool it may just all crumble. I always think banana bread gets better each day as the flavour gets more banana-ey and the cake gets moister. Lovely.


Sunday 23 June 2013

The sauce pan is mightier than the sword!

Caribbean jerk chicken, rice and beans

We were in the mood for some Caribbean food last night - something spicy and comforting that we could have with a few beers - and I found this Jamie Oliver recipe in his 30 minute meals book, though to be honest I have found the '30 minute' aspect of this statement to be somewhat of a myth. I have made a few things from this book and even when I don't cook the full meal (like here I only did the chicken and rice and skipped the corn on the cob and salad) I have never managed to complete it in anywhere near 30 minutes - more like 60 Oliver! Its not important as I didn't have a time deadline and I like chilling and having a drink whilst cooking but I do think you need to be chef trained to manage the task in that time. This recipe is pretty easy to make and is a nice alternative to getting a Saturday night takeaway - for one its healthier, 2 it doesn't break the bank and 3 it tastes so much better! A perfect Beggar's Banquet!


Again this recipe is slightly different than the original as some ingredients I didn't have in (or forgot to buy from the shop) and also I don't have a food processor so I just sliced everything finely but it tasted just as good. I use recipes more as guidelines rather than strict instructions.

Ingredients
(for 2)
2 large chicken breasts
Salt & pepper
Olive oil
4 spring onions, finely sliced
Pinch dried thyme
2 bay leaves
Pinch nutmeg
Pinch all spice
6 tbsp spiced rum (I used Bacardi Oakheart)
6 tbsp white wine vinegar
2 tbsp runny honey
1 red chilli, finely sliced
4 cloves garlic, minced

For the rice and beans:
150g long grain rice, washed
3 spring onions, sliced
pinch cinnamon or a cinnamon stick
500ml chicken stock
1 x 400g tin black beans

Pre-heat your oven to 220°C then prepare the chicken by cutting the breast most of the way down the middle but leaving joined so it flattens the breasts out. Drizzle with olive oil and sprinkle with salt and pepper then rub in. Put a little more olive oil in a hot cast iron pan and add the chicken.

To make the jerk sauce mix together the chopped spring onions and chilli with the rum, white wine vinegar, garlic, all spice, nutmeg, thyme, a splash of olive oil and 1 tbsp honey.

When the chicken is golden turn to crisp up the other side.

For the rice, in a large lidded pan add a splash of olive oil and gently fry the spring onions. Add the cinnamon and cook for a few minutes. Now add the rice and chicken stock and stir. Drain the black beans and stir in to the pot then add the lid and leave to cook for 15 minutes.

By now the chicken should be ready to cook in the oven. Take it off the heat and cover with the jerk sauce - try to rub in and get it underneath the chicken as well as on the top then drizzle oven another tablespoon of runny honey and stick in the bay leaves. Put it in the oven for 15 minutes but keep basting with the sauce every so often. The chicken will be really nice and sticky and golden brown.

Remove the lid from the rice and continue to cook for a little longer if it is still too wet then serve straight to the table (let people help themselves) with some nice cold beers. Perfect Saturday night in.


Saturday 22 June 2013

Rhubarb and custard cake

I've been growing some rhubarb myself and its looking pretty good but unfortunately its still too young to eat it (I'm not going to give in to temptation though as apparently if you are patient with them when they are young they can last for 20 years!) It has got me in the mood to bake with some though so when I was out I bought a bunch of stalks. There are so many amazing rhubarb recipes I have come across and want to try out - think my next attempt may be a rhubarb and custard pie with meringue topping - but for this occasion I went with a cake as I thought it would be easier to transport on the train on a visit to the Mother's.

I added the flaked almonds just because we had some in the cupboard and rhubarb and almond goes really well together (in my humble opinion) but the original recipe doesn't list them. I'm just a bit of a maverick.


Ingredients
400g rhubarb, washed, ends trimmed, and cut into finger sized pieces
250g butter, softened
1 tin custard (I used Ambrosia)
250g self raising flour
250g golden caster sugar (plus another 50g for roasting the rhubarb)
1/2 tsp baking powder
4 eggs
1 tsp vanilla extract
Handful of flaked almonds (if you too are a maverick)
Icing sugar to dust

First to roast the rhubarb. Spread the rhubarb pieces onto a baking tray then sprinkle with the 50g caster sugar and shake a little to coat. Roast at 200°C, covered with foil,  for 15 minutes then remove the foil, shake and return to the oven for another 5 minutes until tender and syrupy. Allow to cool for 20 minutes.

Turn the oven to 180°C and butter and line a 23cm tin.

Mix together about 2 thirds of the tin of custard with the butter, flour, baking powder, sugar, eggs and vanilla extract until smooth. Transfer about a third to the prepared tin then add some of the rhubarb. Add half of the remaining cake mixture on top then more rhubarb and the rest of the cake mix. Level out with a spatula then dollop the remaining custard and a bit of the rhubarb on top and swirl round. 

Sprinkle the almonds on top then put in the oven for 40 minutes until risen and golden then cover with foil and return to the oven for another 15 minutes. A skewer should come out clean when inserted.

Cool in the tin for 5 minutes then transfer to a cooling rack to cool completely. Once cool sift icing sugar over the top.

This cake is pretty good by itself or with custard as a kind of pudding/dessert-type scenario.


Monday 17 June 2013

Shrimp Po Boy Sandwich with a Fresh Twist!

I saw a photograph of this dish on Pinterest during the week and was instantly intrigued to know more - the photograph led me to a recipe on the blog Love and Lemons where they combined the classic Shrimp Po Boy Sandwich with a spicy mango mayo. Sold.
The Po Boy Sandwich, abbreviated from 'Poor Boy' originates from the Deep South, Louisiana to be precise and is so called because these sandwiches were made for the strikers of a streetcar company in New Orleans who were nicknamed the 'poor boys', or so says the internet. The shrimps are battered in a spicy breadcrumb mix then fried and served on some nice crusty french bread with salad. This recipe is actually really easy to make and is one of the tastiest things I have ever eaten. I highly recommend you try it yourself!


Ingredients
(for 2)
225g king prawns, deveined
French stick
Small mango (for mayo and sliced)
Lettuce
Cucumber
Chopped chives

For the mango mayo:
2 tbsp mayonaise
2 tbsp mango chopped into small chunks and squished a little
Squeeze of lemon
Cayenne pepper
Salt & pepper

For the batter:
1 tsp salt
1 tsp garlic flakes or powder
1 tsp onion powder
1 tsp smoked paprika
1/2 tsp cayenne pepper
 1/2 tsp cracked black pepper
1/2 cup milk
1 egg, beaten
3/4 cup breadcrumbs
1/2 cup cornflour
oil for frying

First make the spicy mango mayo then leave in the fridge to chill - simply mix everything together then taste and adjust seasoning accordingly.

In a small bowl mix together all the spices, the breadcrumbs and the cornflour.

In another bowl mix together the beaten egg and milk.

Heat about 1/2 inch of oil in a frying pan. Now dip the king prawns into the egg and milk mixture first then toss into the breadcrumb mixture. Do this with all the king prawns. Fry the battered prawns for about a minute on each size until they are nice and golden and crispy.

To assemble the sandwich; spread the mayo on the cut French stick (we went for about 8 inches!) then layer the lettuce, cucumber and some sliced mango, then the battered prawns, a little more mayo, some chopped chives and a sprinkling of paprika. Now that is a sandwich.


Saturday 15 June 2013

Cranberry and white chocolate cookies (yes in June!)

After a week of no baking I've gone a little bit mad this weekend and have in fact 3 recipes to post! I know this one may seem odd as cranberry and white chocolate cookies are generally considered a festive treat but I have had a packet of dried cranberries in the cupboard since January now (I bought them when they were selling them off after Christmas) and thought it was high time they got used up plus I had a bit of a sweet tooth last night and these only take about half an hour to make. I think the other two recipes are more seasonal to June though so not to worry. This is a simple cookie dough mixture that you can add whatever you feel like to (peanut m&m's are one of our favourites) and the trick with these as with all good cookies is timing. You want to take them out before they get too brown so they are still soft and chewy in the middle so make sure you are around to keep an eye on them!


Ingredients
(makes 12-14 cookies)
190g plain flour
1 cup caster sugar, brown or white or half and half
110g butter, softened
1/2 tsp baking powder
1 egg, beaten
2 tsp vanilla extract
1/2 tsp cinnamon
150g dried cranberries
200g white chocolate, chopped into chunks

First things first, preheat your oven to 190°C and line 2 baking trays with greaseproof parchment then set aside.

Cream together the butter and sugar until they are fluffy. Now add the beaten egg and vanilla extract and mix well.

Sift in the flour, cinnamon and baking powder about a third at a time until fully combined - it should be quite a stiff mixture. Now add in the cranberries and chocolate chunks (or whatever you want to put in) and mix until they are evenly spread through the cookie dough.

Use a teaspoon to dollop the mixture on to the baking trays about 2 inches apart - you don't need to be tidy here or flatten them down as lumpy dollops usually make the best cookies.

Bake for 8-10 minutes, keeping your eye on them so they don't over cook - you want them to be just turning golden.

Leave to cool on the tray for 1 minute then transfer to a cooling rack to cool completely (if you can wait that long!). Delightful.


Saturday 8 June 2013

Spinach flat bread with pulled pork

I was doing my speciality porter pulled pork (click here for recipe) and wanted to have it with something other than the standard white floury bap and also summer it up a bit on this hot sunny afternoon. I thought of doing the pitta bread recipe in my new Paul Hollywood book but struggled to find Nigella seeds so in the end I decided to use the plain wrap recipe and then added shredded spinach and cracked black pepper to the recipe. Adding baby leaf spinach, tomato and spring onions to the pulled pork and spinach wrap really freshened it up and we enjoyed it sitting in the back garden with a nice beer.


Ingredients
(makes 4 wraps)
250g strong white bread flour
7g packet dried yeast
pinch of salt
pinch of sugar
20g butter at room temperature, cut into pieces
160ml cold water
handful shredded baby leaf spinach, washed and dried
olive oil for cooking

Put the flour, yeast, salt and sugar into a mixing bowl and combine. Rub the butter into the flour with a cold hand (run your hand under the cold tap first) until you get a kind of bread crumb texture.

Add the water and mix together to form a dough then knead for about 6-8 minutes on an oiled surface. The dough should be really nice and soft and springy. Place in a lightly oiled bowl, cover with clingfilm and a tea towel and leave to rise for 1 hour.

Turn out on a floured work surface and knock back then form into a flat disk shape. Place half the dry shredded spinach and a good few twists of cracked black pepper into the centre of the disk then fold the dough over and knead to distribute through the dough. Repeat with the rest of the spinach.

Cut the dough into 4 equal pieces and roll each one to about 20cm in diameter (I do this one at a time, as one is cooking I am rolling the next one out - limited space you see). Heat a tbsp oil on full heat in a large frying pan. When the oil is hot place the first wrap into the pan and piece the surface with a fork to let the air out.

Cook for about a minute and a half then flip and cook the other side - they should be a kind of mottled golden brown colour. Repeat with the other 3 pieces of dough, adding a tablespoon of oil each time. Serve warm.


We had this with a couple of Innis & Gunn Original beers which is quite a sweet beer and one to try if you are not really a beer person. It has a lovely sweet toffee and vanilla scent and is very smooth and light - its one of my favourites if truth be told and I also recommend the Innis & Gunn Rum finish which is just delightful!


Monday 3 June 2013

Italian brioche couronne

So yesterday I finally tackled this bread recipe I have been eyeing for a while. Its one of those that has been niggling at me and I've been building myself up to it since seeing Paul Hollywood make it on his Bread program. I will admit I was a little nervous as it is an enriched savoury bread which required filling with mozzarella, parma ham and basil, rolling, then cutting in half, twisting together then bringing into a ring - sounded like it could be messy... But dah da dah da da da daaaah... check out this baby!

I know. I am pretty smug about it and it tasted absolutely delicious, all hot and steamy and melty and doughy in the middle but crispy on the outside, yum. I also made the spicy squash and spinach salad to go with it but added red onions and a slightly different dressing although the bread is a meal in itself.

My mum lent me the Paul Hollywood's Bread book and I also had the recording of that episode on the planner so I watched that first and then found that the recipe in his book differed quite a lot from the one I'd just watched! On the tv show he says  to wrap the dough in cling film and put it in the fridge for a couple of hours then to make the crown and bake straight away whereas the recipe book says nothing about chilling in the fridge and instructs you to prove the bread again after you have made the crown. Confusing huh? Well here's what I did and it turned out majestically - I think it would meet the blue eyed baker's approval.

I actually halved this recipe as there was only 2 of us and it was still pretty large, I can only imagine how big a full size one would be!

Ingredients
250g strong white bread flour plus extra for dusting
5g sea salt
7g sachet dried yeast
85ml full fat milk
2 eggs
125g unsalted butter, cut into small chunks, at room temperature
6-8 slices parma ham
1 ball buffalo mozzarella
Handful fresh basil, ripped
Freshly grated parmesan
1 egg, beaten for glazing

Put the flour in a mixer fitted with the dough hook and add the salt to one side and the yeast to the other. Add the milk and eggs and mix until combined. Now add the butter a bit at a time, allowing it to be taken in by the dough before adding the next bit. After all the butter is added continue to mix for another 5 minutes.

Put the dough into an oiled bowl or container and cover with cling film. Leave on the side for an hour until doubled in size then pop in the fridge for 30 minutes to chill so the dough is easier to handle.

Tip the dough onto a lightly floured surface and roll out into a rectangle, using a floured rolling pin, so it is about 1-1.5cm thick with the long side facing you. Lay the parma ham evenly on top along with ripped pieces of the mozzarella and the basil. Grate parmesan over the top.

Roll towards you from the opposite long side, trying to keep it tight so the filling doesn't fall out, so you have a long sausage shape. Flatten slightly then cut in half (using a metal bread scraper was the easiest method I found). Separate the 2 lengths of dough and lay so the filling is facing upwards. Now bring together and twist, one end clockwise, the other anti-clockwise to form a kind of rope. Bring the 2 ends together to make a loop and press together to link. Transfer to a baking sheet (move quickly to avoid it falling apart) then cover again with cling film and leave to prove again for 1-1½ hours.

Preheat the oven to 200°C about 20 minutes before your proving time is up. Brush the couronne with the beaten egg then sprinkle with grated parmesan and a bit of flour. Bake for 20 minutes then check - it may need another 5 depending on your oven. It should be golden brown. Serve warm when the mozzarella is still oozing!


For the Spicy squash, red onion and spinach salad:
(for 2-3)
1 butternut squash, peeled and cubed
1 red onion, cut into chunks
1 red chilli, deseeded and sliced
1 tsp ground cumin
1 tsp dried chilli flakes
2 tbsp olive oil
2 handfuls baby spinach leaves, washed and dried
Handful green or black pitted olives
Salt and pepper
3 tsp balsamic vinegar

Mix together the butternut squash cubes, onion, chilli, dried chilli, olive oil, cumin and a good season of salt and pepper and roast on a baking tray in the oven for about half an hour or until slightly caramelised.

Add to the spinach and mix in along with the balsamic vinegar and olives. Serve with the lovely Italian inspired brioche crown and a nice glass of wine (olives do not go with beer at all - this I have learnt!) and enjoy!


Sunday 2 June 2013

A trip to Barcelona!

I haven't posted since last weekend and I can tell you why - we've been to Barcelona for a little break! I think we definitely needed it as we've not been away since August (excluding a night away in York for the wife's birthday) and sometimes things just get on top of you and you need a change of scenery you know. I've never been to Barcelona before (actually I've never been to mainland Spain before) and I can honestly say it is my new favourite city - it ranks above Paris and Dublin for sure and I am a big fan of both these cities. The whole lifestyle is completely different and it seems so much more laid back! The availability of amazing fresh produce, the sunshine, the fact that everyone either rides a bicycle or a scooter (I want one!) and the cute little cafes cluttering the Gothic Quarter made me not want to come back at all! I wish in the UK we could take a lead from the Catalonians in terms of the availability of fresh bread and baked goods, fresh meat and fish as well as fruit and veg. I know there are green grocers and fishmongers etc in Manchester but it's the quantity of them that doesn't compare. People would rather go to the supermarket to buy all their groceries than go to a specialist shop where the quality is far better and the price too! I don't want to get on my soapbox but you will see what I mean from these photographs I have taken from the La Boqueria market off La Rambla, the main shopping street.


I got up early on 2 of the days after the first time we visited the market on our first afternoon it was rammed with shoppers and tourists - all part of the atmosphere but I'm not a big fan of crowds! I would leave my fella in bed at the hotel and wander around the stalls as they were still setting up, the only other people about being the locals, so I could take some photographs of the amazing displays. Then I'd buy us some fresh fruit and pastries, attempting to use my limited knowledge of the Spanish language on the stall workers (though somehow they always knew I was English...) and then head back to the hotel for breakfast in bed.


This was definitely one of my favourite stalls - the variety of chocolates and confectionery made my eyes bulge and it all looked so beautiful! They almost looked too good to eat but that would definitely not be the case.


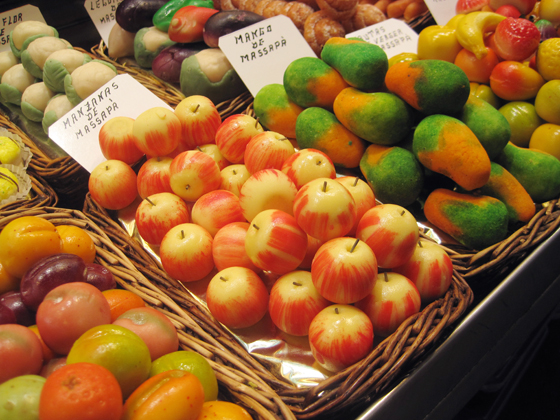
These were the beautifully vibrant marzipan fruits which covered one of the stalls - every fruit you could think of - and they look so realistic too.


Even the ice lollies were perfectly displayed, like a work of art. The market stall holders really take pride in their displays.


Ice cream in every flavour you could wish for. I myself went with a Viennese coffee and hazelnut (2 scooper). Heaven man.


Anyone for a meat lolly? Didn't try one of these myself...


I don't know how all the Spanish women can stay so slim with all of this on offer - we became big fans of the tarta de manzana (Spanish apple tart to me and you) as a breakfast treat.


I bought some spices from this stall to bring back to experiment with in my own recipes, as well as some rum and a bottle of whiskey (for the drinks tray which was getting a little low).


Barcelona is such a beautiful and inspiring city with stunning architecture and creativity everywhere. The two things I think I have taken from this trip are number one; to get the garden sorted and make the most of the space we have - the balconies of the Barcalona appartments were all crammed full of plants and flowers, making the most of those tiny spaces and I think our little bricked yard has definite potential. The second goal I have made inspired by our trip is to bake more bread. This has actually been put into action today as I have made a Mediterranean influenced brioche crown with mozzarella, parma ham and basil, a Paul Hollywood recipe, which I am going to post within the next few days. All in all an amazing trip with a lovely fella.