Sunday 26 May 2013

A Spanish tortilla morning

I thought I'd attempt to make a Spanish tortilla this morning to get us in the mood for this coming week as we are off to Barcelona! ...although I think the food in Barcelona is slightly different to the traditional Spanish cuisine as it is actually the capital of Catalonia however I think it is influenced by the Spaniad's. I am looking forward to trying all the different food so much as well as the gorgeous weather and exploring the beautiful city. This is the first time I have made one of these and I think it turned out alright - I'm always a bit nervous about the moment of flipping!


Ingredients
(for 2 individual sized tortilla)
6 eggs, beaten
1/2 white onion, chopped
400g new potatoes, thickly sliced
olive oil
chopped parsley

Heat the olive oil in a pan (or 2 small pans if you are doing individual sized portions) and cook the onion and new potatoes covered with a lid for about 20 minutes or until a knife can be put through the potatoes easily.

Take off the heat and strain the onions and potatoes, saving the oil and juices. Add the potatoes and onions to the beaten eggs. Season with salt and pepper.

Heat the oil again in the pan then add the mixture to the frying pan. When the eggs are almost set use a spatula to scrape around the edges then invert onto a plate and slide back into the pan to cook the other side.

Serve with chopped parsley. These are also really good served cold and I think we are all set now for our trip. Just need to pack now...


Wednesday 22 May 2013

Mushroom risotto with chicken and chorizo

So I know its only Wednesday but I had a few bits left over from the weekend and I was finished at Uni early so I decided to go all out and make a risotto - I know! Usually its just pasta or noodles for tea of a mid week evening but I was in the mood for cooking and had some vino that needed using too.

It is quite difficult to photograph something like risotto and make it look appetising and I am aware that this looks a bit grey (on account of the mushrooms) but it really did taste very nice - especially with the chicken and chorizo. I think I need to invest in some different plates and dishes to get some more varied photographs but I've not got around to it yet having only just settled recently - I'll put it on the to do list.


I have made risotto a fair few times and usually stick to the recipe in my Gary Rhodes Keeping It Simple book - the first cookbook ever given to me by my mum one Christmas, I think I was about 13. That is the basic recipe for parmesano risotto and I would just add whatever I fancied from the fridge but Ive recently moved on to a recipe which includes using white wine as it really adds something and is super tasty (plus you can drink the rest - winner). Risotto is a pretty labour intensive dish as it requires constant stirring to release the starch in the rice to make it lovely and thick and creamy so it is a good job I had the wine to keep me company.

Ingredients
(for 2)
For the risotto:
olive oil for cooking
200g arborio rice
1/2 white onion, finely chopped
1 clove garlic, crushed
100-150g mushrooms, washed and sliced
100ml white wine
1 litre chicken stock (you may not need all of this)
15g butter
25g parmesan cheese, grated

1 chicken breast
1/2 chorizo ring

First heat about 2 tbsp olive oil in a deep sided saucepan on a medium heat and add the onion and garlic, frying for about 5 minutes until softened. 

Add the mushrooms and season with salt and pepper then cook for a further 5 minutes.

Now add the arborio rice and stir until it is coated with the onion and mushroom mix. Cook for about a minute. Add the wine and stir regularly until all the wine has been soaked up by the rice.

Add the stock a ladle at a time, stirring until it has gone then adding another ladle. Repeat until it looks creamy and tender. By the last ladle the rice should be almost cooked - this all takes bout 30-40 minutes.

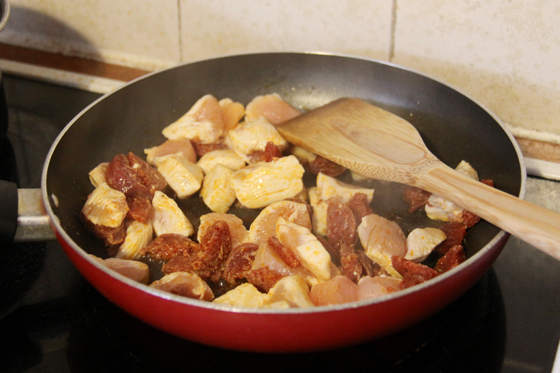
In a separate frying pan fry the chorizo and chicken in a little olive oil - the chorizo will release its oils so you really don't need much oil. The chicken will soak up the flavours from the chorizo and taste really good. Fry until the chicken is completely cooked.

The risotto should now be thick and creamy, if it is still watery continue to cook, stirring until the moisture has gone. Take the risotto off the heat and stir in the butter and parmesan cheese then put a lid on or cover with foil and leave to stand for a couple of minutes. Check seasoning and add more salt and pepper if desired.

Serve the chicken and chorizo on top of the risotto with a sprinkling of grated parmesan and chopped parsley.


Sunday 19 May 2013

Auntie G's Sticky Ribs

I meant to post this recipe last week but didn't get around to making these until yesterday. The recipe was given to me by my Auntie G who makes the best ribs I have ever eaten - seriously I dream about these ribs. It's the thing I look forward to most at barbeques and family get-togethers and I've been pestering her for a while for the recipe so I can see if when I make them myself they live up to the legend. I can confirm these did not disappoint and smelt and tasted amazing.


So I actually used 1kg of spare ribs - I got them from the meat market in the Arndale as they are usually pretty reasonable and you know it is good quality. A lot of the top restaurants in Manchester get their meat from there so if its good enough for them...!


Ingredients
1 kg pork spare ribs (I know the recipe would be 700g but I do love ribs)
1 onion, chopped
2 medium cloves garlic, crushed
2 tbsp tomato purée
1 tbsp white wine vinegar
3 tbsp clear honey
1 tsp mixed herbs
1/2 tsp chilli powder
150ml chicken stock
2 tbsp olive oil

First fry the onion and garlic in the olive oil until softened.

Add the tomato purée, white wine vinegar, honey, mixed herbs, chilli powder and stock and bring to the boil then lower the heat and simmer for about 15 minutes. The sauce should thicken.

I left my ribs to marinade for about an hour and a half to 2 hours while we went the pub for a quick few halves so if you're doing this allow the sauce to cool first before coating the ribs with the sauce. You don't have to leave them to marinate you can just cook them immediately.

Preheat the oven to 190°C and arrange the ribs in a roasting pan. Spoon the sauce over the ribs and turn the meat, rubbing the sauce into the ribs to make sure they are evenly coated. Cover with foil and cook for 30 minutes.

Remove the foil and spoon the sauce over the top of he ribs, turning them to coat them again with the sauce. Return to the oven for another 45-60 minutes (I found it was nearer 60 minutes) and re-coat and turn the ribs several times during this time - I did this every 15 minutes - to ensure they are nicely coated and don't burn. The meat should be nicely browned and sticky with crispy bits. 

And enjoy! (I know we did!)


Saturday 18 May 2013

Blueberry Pancakes for a Blue May Morning

Its one of those grey drizzly Manc mornings that makes you want to just stay in bed all day but I managed to drag myself from under the duvet and now I'm up I am definitely in need of some sunshine food. I think I've made clear my love of pancakes before and blueberry is a particular favourite (plus blueberries are good for you being one of those super-foods so its win-win all round!)


Ingredients
(serves 3-4)
150g plain flour
pinch of salt
1 1/2 tsp baking powder
240ml milk
1 egg
100g fresh blueberries, washed
knob of butter for cooking
golden syrup for serving

Sift together flour, salt and baking powder in a large mixing bowl. Make a well in the centre and add the egg and a bit of milk and whisk together, gradually adding the rest of the milk to make a smooth batter with no lumps.

Leave to rest for 10 minutes.

Now stir in half the blueberries. In a large frying pan heat the butter until it has coated the bottom of the pan (on a medium heat). Drop a ladel full of the mixture into the frying pan - do this so you can fit another few in the pan, I usually manage to do 3 at a time. Leave to cook for about 3-4 minutes or until golden brown then flip and cook the other side for about 2-3 minutes.

If you do in batches of 3 you can keep the cooked ones warm by separating with greaseproof paper and keeping in the oven on a low heat.

Pile the pancakes and drizzle with golden syrup then add the rest of the bueberries on top and eat immediately. Instant sunshine. I feel much better.

Friday 17 May 2013

Proper Homemade Crusty Bread

There's nothing like baking your own bread and I try to do it whenever I can. Since having my own kitchen I've become totally hooked and am on a mission to try to make more different types of bread this year. So far I've done a brown ale bread, a few white crusty loaves, bialys (these are a fave of mine), a plain soda bread and a cheddar and walnut soda bread... I've probably missed some but there are many more on my to do list. The best slice is always the first one straight from the oven with a bit of butter! This is one of the easiest breads to make so its a good one to start with if you're just starting out.


Ingredients
500g strong white bread flour
1 x 7g sachet dried yeast
1/2 tsp salt
1 tsp sugar
2 tbsp olive oil
325ml lukewarm water
flour for dusting

First sieve your flour and salt into a large mixing bowl or the bowl of your mixer and stir to combine.

In a jug whisk together the water, yeast, sugar and olive oil then slowly add to the flour and salt. I used an electric mixer to start it off, for about 5 minutes, on a low speed then kneaded it by hand on a floured work surface for about another 5 minutes (just cos like the feel of the dough) but you can just use the mixer if you like.

Once the dough is nice and springy shape into a round then pop in a bowl and sprinkle with flour. Leave in a warm spot covered with a damp tea towel for 1 hour.

On a floured work surface knock back the dough - this is to get rid of the air that has built up - so you do this by kneading it again for a couple of minutes. Shape the dough into whatever shape you want again - I went with a standard oval then leave on a floured baking tray under a clean tea towel for another hour and a half to prove again.

20 minutes to the end preheat your oven to 220°C and but a baking tray in the bottom of the oven to heat up.

Once the dough is ready to be baked remove the tea towel and slash the top of the loaf with a sharp knife. Dust with flour then put in the middle shelf of the oven. Throw a handful of ice cubes into the heated baking tray to create lots of steam to give the bread a nice crust. Bake for 25 minutes on 220 C then reduce the heat to 200 C for a further 10 minutes.

Remove from oven and put on a cooling rack. I have to have a slice when its still warm with butter. Nothing better.


Tuesday 14 May 2013

Time to dig out the paints!

I was feeling a bit creative at the weekend so I decided I was going to dig out my paints and paint Bruce's portrait. I can't remember the last time I did any painting even though I love it and I really must try to find time to do it more often. It took me back to my days at art school and although my fella said I was an oddball I carried on regardless and I am actually pretty happy with it (I've threatened to do his next and then a family one of the three of us!). Its not very often I do something I'm proud of but I think it deserves a spot on the wall.


I also took a few more photos of my boy - still waiting to get the money shot for the wall. What do you reckon? You think it looks like him? He's getting big now - he looks pretty chunky here. I think he's fully grown though now.

Sunday 12 May 2013

Porter Pulled Pork Baps

So this recipe first started off as the Cajun Pulled Pork recipe from Sunday Brunch which I've made about four or five times which is slow cooked in cider. Pork and apple is always a classic combo and I love pulled pork. But you know what I also love? Beer. I'm not talking about Carling and Fosters or any of that rubbish I'm talking about proper real ales. Beer that people care about making and the people who drink it know the difference between a good beer and an average beer. A nice sweet oak aged or a rich porter or stout - that's what I'm talking about. I did used to drink a lot of cider but I felt that the combination of pork and beer could be something of a revelation. I have found a few variations of beer pulled pork recipes online but I just did this one on instinct really, trying the beer first and then deciding what herbs and spices to use from that - brave move I know but I am somewhat of a kitchen maverick!


I served my pulled pork on some floury baps (with gherkins if you have them) and some roasted carrot and sweet potato chips on the side. The meat is so moist and tasty that you don't even need any sauce.

Ingredients
(serves 4)
2kg pork shoulder joint (or anything around that)
2 onions, chopped into chunks
2 cloves garlic, minced
1 tbsp wholegrain mustard
1 tbsp chilli powder or flakes
1 tbsp thyme (dried)
3 tbsp dark soy sauce
400ml porter or stout of your choice (in this recipe I used a bottle of Young's Double Chocolate Stout but you could use anything - even a Guinness Extra Stout would be nice or the Anchor Porter is the one that I want to try next. I made a porter pulled pork once before and I know this is technically a Stout pulled pork but I liked the alliteration in the title!)

The pork needs to be cooked slowly on a low heat to make it really tender and takes 4 hours to cook so make sure you give yourself enough time if you are planning on eating at a specific time so preheat the oven to 170°C.

First to prepare the meat; I have to make sure that I wash the meat by running it under the cold tap to get rid of anything that may be on it and also get rid of any hairs that may be on it (these will be burnt off in the oven but just to make sure). Scatter a few onion chunks and a bit of garlic into a deep roasting tin and place the meat on top. Now mix together the mustard, chilli powder, thyme and a good pinch of salt and pepper to make a paste and rub that all over the meat, including the underneath. Scatter the rest of the onions and garlic over the meat and then pour the porter or stout over the top along with the soy sauce. Cover with parchment paper then foil and roast for 3 hours.


Remove the foil and paper and try to pour some of the juices over the top of the meat. Now return it to the oven for 1 hour to form a nice crispy edge. About 30-40 minutes before the end put in your wedges, if that's what you are having it with. I coat mine with a bit of oil and sprinkle with plenty of salt and pepper, a sprinkling of chilli powder and some paprika.

Take out of the oven and pull apart with forks - this should be very easy! Serve immediately with floury baps and the crispy roasted carrot and sweet potato chips. You can just leave the pan in the middle of the table and let people get stuck in themselves if you like. I declare this recipe a success!


Saturday 11 May 2013

Spinach and Cheddar Pancakes

This is another mighty fine breakfast recipe made up from left overs we had lying about. I love pancakes in all their glorious forms; sweet and savoury. You can add anything to the mix or fill them with anything you want. Today we had some spinach, half a block of cheddar and some mushrooms in the fridge so I decided to get creative and make these little delights!


Ingredients
(for 2)
1 cup of plain flour
1 egg
1 cup milk
1 tsp baking powder
pinch of salt
3/4 cup of grated cheddar cheese
3/4 cup spinach washed and chopped/shredded
2 cups mushrooms sliced
knob of butter

So here's how to make them:

Sieve the flour, baking powder and salt into a large mixing bowl and mix. Add in the egg and gradually add the milk whisking as you do so. Whisk until smooth.

Add the cheddar and spinach and mix until combined then leave to rest for 10 minutes.


After about 5 minutes you can cook your mushrooms ready for topping the pancakes. In a separate frying pan heat a knob of butter then add the sliced mushrooms, tossing slightly to coat them in the butter. Add plenty of salt and pepper and fry until nice and golden.

Now heat a knob of butter in a frying pan until it coats the surface. Using a ladle spoon three spoons of the mixture (or four, depending on the size of your pan) so they are not touching each other. Leave for about 3 minutes or until the pancakes are just starting to bubble. Then flip using a spatula and leave for about 2 minutes.

Repeat until all the mixture is gone. Whilst cooking your other pancakes keep the others warm by sacking on a plate and separating with kitchen roll.

Then stack on a plate and top with the fried salt and pepper mushrooms and sprinkle with chopped parsley. Now get stuck in!

Thursday 9 May 2013

Life, Oh Life

Just wanted to post a few snaps from everyday life: pics of my home and what I've been up to - not much exciting I'll admit! I'm planning to try out a new recipe this weekend that my Auntie has given me for sticky spare ribs so I'll be posting that over the weekend - looking forward to that. They've given out a pretty poor weather forecast so I think this weekend will be a case of cosying up with Bruce and my new book (The Somnambulist by Essie Fox), doing a bit of home cooking, maybe a gallery tour/pub crawl on Saturday...


Wakey wakey


Got to have a well stocked drinks tray! I'm actually looking to get some sours for making cocktails - I don't suppose anyone knows where I could get them from?


Waiting for the tram to get to work.


A good book and a cup of Earl Grey.


You are a handsome dog Brucie (and so stylish too!)


Blue Peter chic.

Tuesday 7 May 2013

A lovely Saturday night chilli

I hope everyone has had a lovely Bank Holiday weekend! The weather has been delightful and I think I even caught a bit of sun yesterday - I have vague tan lines on my feet from my sandals anyway... I made this chilli on Saturday night - I put a ladle full in my Huevos Rancheros on Sunday morning to add a little meatiness - but I've only got around to posting the recipe now (it's been a busy weekend!)


When I do a chilli I like to serve it on a baked tortilla. The edges are nice and crispy and then the centre goes all soft and soaks up the sauce. You just need to pop it under the grill for a few minutes but make sure you keep an eye on them as they can burn pretty quickly.

Ingredients
(for two with a bit left over)
250g lean minced beef
1/2 white onion, chopped
1/2 green pepper, chopped
1 clove garlic, minced
400g tin red kidney beans, drained
400g tin chopped tomatoes
1 beef stock cube dissolved in 180ml boiling water
2 heaped tbsp chilli powder
1 tbsp paprika
1/2 tbsp cumin
1 tbsp white wine vinegar
salt and pepper
150g long grain rice
sour cream and jalapeños to serve (and a beer of course)

In a large lidded pot and on a low heat soften your onions in a glug of olive oil for about 5-10 minutes then add the garlic and green pepper and cook for a minute more. Turn the heat up to medium and add the beef, breaking it up and cooking until there are no longer any pink bits - about ten minutes. Add the chilli powder, cumin and paprika and season with salt and pepper. Cook for a minute then add the tomatoes, beef stock and vinegar. Leave to simmer, with the lid on, for about 45 minutes.

Add the kidney beans and simmer for another 15 minutes. Meanwhile rinse and cook your rice (see pack for cooking time). Toast the tortillas under the grill for a couple of minutes just before you are ready to serve.

Serve the rice and chilli on the toasted tortilla with a dollop of sour cream and some jalapeños. We teamed ours with a Theakston's Old Peculiar Ale which is quite a rich smooth ale and is recommended with strong stews and puddings. It did actually go well with the chilli and complimented the strong spicy flavours. I think a nice Indian Pale Ale would also have gone well.


Sunday 5 May 2013

Buenos dias Huevos Rancheros

Ola! This is a dish that will wake you up in the morning and after a few ales last night its just what we needed! It has a nice kick but its not too spicy for a breakfast. I've wanted to make this classic for a while and its a bit similar to the chorizo and bean skillet bake I've posted before in that its all cooked in the one pan and contains eggs cooked in tomato - a winning combination!

This took me about half an hour to make so its not too time consuming and is definitely worth it. I don't think its the traditional way of making this dish as the sauce and eggs are usually served on top of a tortilla whereas in this recipe the tortillas are cut into strips and baked under the grill. Its an adaptation of the original - the rebel child.


Ingredients
(para dos)
1 400g tin chopped tomatoes
Handful jalapeños, chopped
1 red onion, chopped
1 garlic clove, minced
2 plain tortilla
2 eggs
Salt and pepper
Feta for crumbling
Cheddar cheese, grated, for topping
Sour cream
Pinch of paprika
Chopped parsley

First preheat your oven to 220°C. Now soften your onions in a drop of olive oil in a cast iron pan, for about 5 minutes. Add the minced garlic and jalapeños and cook for a further minute (it might be best to check the heat of your jalapeños first so you don't add too many, it depends what you like...) Add the tinned tomatoes and season with salt and pepper then allow to simmer for about 15 to 20 minutes. I also added a ladle of beef chilli left over from last night's tea which added a nice bit of meatiness but this isn't in the traditional recipe and is not strictly necessary (it was just to use it up).

Whilst the sauce is simmering cut your tortillas into strips about 1cm wide (see pic below). If you use a pizza cutter this is done in no time. Brush a baking sheet with olive oil and lay out the strips then brush the tops of the strips with the oil. Sprinkle with sea salt and bake in the oven for about 3-6 minutes until they start to brown a little and are nice and crispy. Remove from oven and turn off.

Once the sauce has thickened a bit its time to cook the eggs. Remove the sauce from the heat then crack the eggs into the pan (I used two 8" skillets for individual portions). Cover with a pan lid and return to a low-medium heat for about 6-8 minutes - the eggs should be white but not completely opaque. Take off the heat.

Now preheat your grill and then arrange the tortilla strips on top of the sauce/eggs, you might have to break them up a bit. Sprinkle with the feta and cheddar then pop under the grill to melt the cheese and finish cooking the eggs.

Serve immediately with dollops of sour cream, a sprinkling of paprika, a few jalapeños and chopped parsley. Buen apetito!


Saturday 4 May 2013

Big Bad Ass Breakfast Rosti

I think I should rename this blog 'A Beggar's Breakfast' as that's all I seem to post, though I'm not sure it has the same ring to it... I'm a big fan of the breakfast. In fact I'd say it's my favourite meal of the day and it's become a weekend tradition now for me to make us a special breakfast on a Saturday morning. I've not had chance to get anything in and the cupboards were pretty bare so I had a quick flick through my cookbooks and a browse on my blogs and came up with this one. It's made up of stuff that everyone has in their cupboards so no need to worry about getting to the shops. I suppose I could've done pancakes but I fancied trying something new and these looked pretty good - kind of a bit like a pancake but more like Bubble and Squeak.


Ingredients
(for 2)
1 medium potato, grated
1 red onion, finely sliced (I couldn't face grating it)
20g plain flour
1/2 tsp baking powder
1 egg, beaten
Splash of milk
Salt & pepper
Oil for frying
2 eggs for frying

First grate your potato and finely slice your onion (you want long thin slices and I'd recommend grating the potato length ways so you get nice long strands so the rosti holds together). Once you have grated your potato put it in a clean tea towel and try to ring out as much liquid as you can over the sink.

Now to make the batter, in a large bowl whisk together the flour, baking powder and the egg until you have quite a smooth runnyish batter. If it is too thick add some milk to the mixture. whisk until there is no trace of flour then season with salt and pepper. Add the potato and onion and mix together until they are evenly coated. 

In a cast iron pan or 2 small cast iron pans (I use my two 8" skillets for perfect individual portions) heat a splash of olive oil. Divide the mixture into the 2 pans and spread out evenly so it covers the bottom of the pan. Leave and cook on a medium heat for about 4 minutes, perhaps a little longer depending on your hob. You want a golden brown colour. Flip the rosti and cook the other side for about 3 minutes.

Meanwhile in a separate frying pan fry your eggs. Now I have always struggled with fried eggs and I usually have to get my fella to do them but today was the day I got a lesson from the master so I have no excuse next time - its gonna be all me. Apparently the trick is to use quite a lot of oil and get it really hot before cracking your eggs into it. You then turn the heat down a little and try to flick the oil up over the top onto the yokes to cook the top. They only take a couple of minutes and there you go - perfect fried eggs.

Serve immediately (we just eat ours from the pans) with the fried eggs, chopped parsley and plenty of brown sauce. Lovely.