Showing posts with label bread. Show all posts

Sunday, 1 September 2013

Rosemary & Roasted Garlic Bread

“'A loaf of bread,’ the Walrus said, ‘is what we chiefly need: Pepper and vinegar besides are very good indeed.'" - Lewis Caroll.

I've already mentioned my current bread obsession and here is another one to add to the collection - a rustic rosemary and roasted garlic bread! This bread is so tasty and really comforting straight from the oven and it made not just our kitchen but the whole street smell amazing! I have never been to Italy (hopefully next year) but I imagine its a bit like this.


Ingredients
500g strong white bread flour
3 1/2 tsp dried yeast
1/2 tsp sugar
2 tbsp olive oil plus extra for roasting garlic and greasing tin
300ml luke warm water
1 bulb garlic
2 tbsp butter, at room temperature
Small bunch of rosemary
Salt and pepper

Preheat the oven to 180°C.

Mix together the water, sugar, yeast and olive oil with a fork until the yeast and sugar has dissolved. 

In a large mixing bowl make a well in the centre of the flour. Add the liquid mixture and combine until you get a rough dough.

Transfer to a floured work surface or an electric mixer fitted with the dough hook and knead for about 5-10 minutes (a bit longer if kneading by hand). Then lightly oil, cover with cling film and a tea towel and leave to prove in a warm room for 1 hour.

Meanwhile wrap the garlic, drizzled with olive oil in foil and put in the oven to roast for 1 hour.

When the dough has risen, knock back on a floured work surface then roll out to a rectangle, about 2cm in thickness. Lightly oil a rectangular baking tray and place the rolled dough on to it. Prick all over with a fork.

To make the garlic butter topping mash together the roasted garlic flesh (dispose of the shell), the butter, rosemary and a good few twists of salt and pepper. Spread over the dough and leave to prove a second time for 30 minutes.

Preheat the oven to 220°C about 20 minutes before the proving time is up. Bake for about 15-20 minutes until golden and risen. Leave to stand for a couple of minutes then tuck in!


Saturday, 31 August 2013

Mega Cheese and Bacon Skillet Scone

Really into my breads at the moment, in fact as I'm writing this recipe up I have some dough rising on the side and some garlic roasting in the oven for a (hopefully) lovely garlic and rosemary bread. This mega scone I can confirm was a lovely bread. It was really easy to make too and you don't even have to leave it to prove, literally just bash it together, stick it in the oven and bam ready. Ideal if you're short of time and all the ingredients are the kind of stuff likely to already be knocking about the kitchen. I just made this one weeknight and we had it with a couple of tins of tomato soup; dead easy and tasty (especially when eaten whilst still warm).


Ingredients
200g self raising flour
1 tsp baking powder
40g butter, cut into cubes
1 packet smoked bacon lardons (about 180g-200g)
1/2 tsp cayenne pepper
100g mature cheddar, grated, or any cheese of your choice (this is for quite a cheesy scone - just decrease the amount if you don't want it so cheesy)
about 100ml milk

First fry off your bacon until it is nice and cripsy then put aside on some kitchen roll to drain the fat from them.

Preheat your oven to 220°C and lightly oil an 8 inch skillet pan (don't worry if you dont have one you can use a cake tin or a casserole dish or even just a baking tray - I just like skillets and this creates a nice crust).

In a bowl mix together the flour, baking powder and cayenne pepper then add the butter cubes and rub in to the flour using the tips of your fingers (like you're making pastry) until you have no lumps of butter. Mix in the grated cheese and bacon bits then add a bit of milk, adding a little more until it comes together into a ball.

Knead a couple of times - you just want it to form a rough ball, don't be tempted to knead it loads as this will give the scone a tough texture.

Place the dough into the oiled pan and put a cross in the top by pushing the handle of a wooden spoon firmly through the dough (this makes it easier to break up later) then sprinkle with a little more cheese and some cracked black pepper and bake in the oven for about 35 minutes.

If it looks like it is browning too much turn the oven down to 200°C for the rest of the time.

Check it by tapping the bottom and if it sound hollow then its done! This goes really well with soups and stews as it has that kind of dumpling texture or just by itself with a bit of butter.


Monday, 19 August 2013

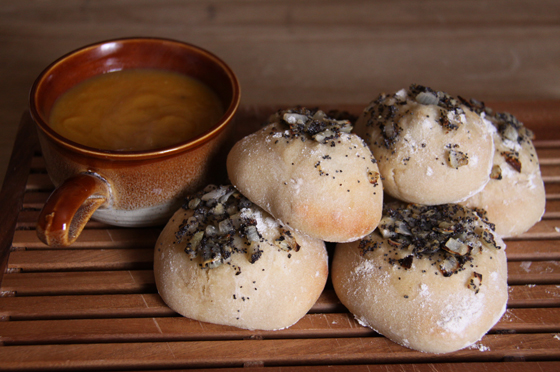
Freshly baked Bialys

These have been a favourite of ours ever since I made them a few months back and despite the 4 hour preparation time they are definitely worth the effort! There is nothing better than these little babies straight from the oven and accompanied by some homemade soup they are an absolute delight!


The Bialy is very similar in texture to the bagel - soft and chewy - however being baked only and not boiled prior to baking they have a much softer crust than that of their bagel brother. I had never heard of the Bialy before and came upon the recipe on the Smitten Kitchen blog (one of my blog obsessions). I was instantly like 'I have to make these', and from the photographs alone I was salivating. I often wish that we had more of a bakery culture in Manchester (and I cannot count Greggs as an authentic bakery); other cities seem to be spoilt with baked goodness but I must get my kicks by recreating such things in my own kitchen. There is one traditional Jewish bakery in Cheetham Hill I have been to which is the only one that has come close to my expectations and I was like a child in a sweet shop, greedily wanting to buy everything! In the end I settled for a seed topped Challah bread and a selection of bagels. This was not enough.

So I have made these about 4 or 5 times since discovering them and I am still trying to perfect the shape - mine always rise too much compared with the lovely Deb's. I think it is the shaping - I need to thin out the centres more so the onion filling is not pushed out when they are baked. I believe perseverance is the key and if I make these enough times I will master the art - you gotta have a dream! So here's how you make them...

Ingredients
(makes 6)
300g strong white bread flour
1/2 tsp fast action dried yeast
1 tsp sea salt
175ml water, at room temperature

1/2 small onion, chopped
1 tbsp poppy seeds
Olive oil
Salt & pepper

In a mixing bowl or bowl of an electric mixer add the flour and then the yeast to one side and the salt to the other so they are not touching (the salt will kill the yeast). Using the dough hook mix on a low speed and slowly add the water to form a soft dough. Turn up to a medium speed and mix for about 7 minutes. If you are doing this by hand you will probably need to double this time.

Cover the dough and leave to rise in a warm place for about an hour and a half to 2 hours. Because of the low yeast content it needs longer than other breads to rise but this is what gives it the dense chewy texture.

Deflate the dough by pressing down then transfer to a floured work surface and cut into 6 equal pieces. Shape the pieces by pressing your thumbs into the centre and turning round in your hands. Fold the edges in to the well made by your thumbs to make a kind of pouch then place (pinch side down) on a floured baking tray. Cover and allow to rise for another 2 hours.

30 minutes before that time is up preheat your oven to 250°C or as high as it will go.

To make the onion filling heat the olive oil and fry the chopped onion on a medium heat until soft and translucent (between 5 and 10 minutes). Add the poppy seeds and a good few twists of sat and pepper - taste and adjust to your liking. Allow to cool a little.

Take each dough ball at a time and make a firm indent in the centre - working the dough to flatten it out making a kind of spaceship shape. Add a spoonful of the onion into each well and lightly press down. Sprinkle with flour and bake for 6-10 minutes until mottled golden brown. Allow to cool for a couple of minutes until just warm then enjoy the baked goodness!


Monday, 3 June 2013

Italian brioche couronne

So yesterday I finally tackled this bread recipe I have been eyeing for a while. Its one of those that has been niggling at me and I've been building myself up to it since seeing Paul Hollywood make it on his Bread program. I will admit I was a little nervous as it is an enriched savoury bread which required filling with mozzarella, parma ham and basil, rolling, then cutting in half, twisting together then bringing into a ring - sounded like it could be messy... But dah da dah da da da daaaah... check out this baby!

I know. I am pretty smug about it and it tasted absolutely delicious, all hot and steamy and melty and doughy in the middle but crispy on the outside, yum. I also made the spicy squash and spinach salad to go with it but added red onions and a slightly different dressing although the bread is a meal in itself.

My mum lent me the Paul Hollywood's Bread book and I also had the recording of that episode on the planner so I watched that first and then found that the recipe in his book differed quite a lot from the one I'd just watched! On the tv show he says  to wrap the dough in cling film and put it in the fridge for a couple of hours then to make the crown and bake straight away whereas the recipe book says nothing about chilling in the fridge and instructs you to prove the bread again after you have made the crown. Confusing huh? Well here's what I did and it turned out majestically - I think it would meet the blue eyed baker's approval.

I actually halved this recipe as there was only 2 of us and it was still pretty large, I can only imagine how big a full size one would be!

Ingredients
250g strong white bread flour plus extra for dusting
5g sea salt
7g sachet dried yeast
85ml full fat milk
2 eggs
125g unsalted butter, cut into small chunks, at room temperature
6-8 slices parma ham
1 ball buffalo mozzarella
Handful fresh basil, ripped
Freshly grated parmesan
1 egg, beaten for glazing

Put the flour in a mixer fitted with the dough hook and add the salt to one side and the yeast to the other. Add the milk and eggs and mix until combined. Now add the butter a bit at a time, allowing it to be taken in by the dough before adding the next bit. After all the butter is added continue to mix for another 5 minutes.

Put the dough into an oiled bowl or container and cover with cling film. Leave on the side for an hour until doubled in size then pop in the fridge for 30 minutes to chill so the dough is easier to handle.

Tip the dough onto a lightly floured surface and roll out into a rectangle, using a floured rolling pin, so it is about 1-1.5cm thick with the long side facing you. Lay the parma ham evenly on top along with ripped pieces of the mozzarella and the basil. Grate parmesan over the top.

Roll towards you from the opposite long side, trying to keep it tight so the filling doesn't fall out, so you have a long sausage shape. Flatten slightly then cut in half (using a metal bread scraper was the easiest method I found). Separate the 2 lengths of dough and lay so the filling is facing upwards. Now bring together and twist, one end clockwise, the other anti-clockwise to form a kind of rope. Bring the 2 ends together to make a loop and press together to link. Transfer to a baking sheet (move quickly to avoid it falling apart) then cover again with cling film and leave to prove again for 1-1½ hours.

Preheat the oven to 200°C about 20 minutes before your proving time is up. Brush the couronne with the beaten egg then sprinkle with grated parmesan and a bit of flour. Bake for 20 minutes then check - it may need another 5 depending on your oven. It should be golden brown. Serve warm when the mozzarella is still oozing!


For the Spicy squash, red onion and spinach salad:
(for 2-3)
1 butternut squash, peeled and cubed
1 red onion, cut into chunks
1 red chilli, deseeded and sliced
1 tsp ground cumin
1 tsp dried chilli flakes
2 tbsp olive oil
2 handfuls baby spinach leaves, washed and dried
Handful green or black pitted olives
Salt and pepper
3 tsp balsamic vinegar

Mix together the butternut squash cubes, onion, chilli, dried chilli, olive oil, cumin and a good season of salt and pepper and roast on a baking tray in the oven for about half an hour or until slightly caramelised.

Add to the spinach and mix in along with the balsamic vinegar and olives. Serve with the lovely Italian inspired brioche crown and a nice glass of wine (olives do not go with beer at all - this I have learnt!) and enjoy!


Friday, 17 May 2013

Proper Homemade Crusty Bread

There's nothing like baking your own bread and I try to do it whenever I can. Since having my own kitchen I've become totally hooked and am on a mission to try to make more different types of bread this year. So far I've done a brown ale bread, a few white crusty loaves, bialys (these are a fave of mine), a plain soda bread and a cheddar and walnut soda bread... I've probably missed some but there are many more on my to do list. The best slice is always the first one straight from the oven with a bit of butter! This is one of the easiest breads to make so its a good one to start with if you're just starting out.


Ingredients
500g strong white bread flour
1 x 7g sachet dried yeast
1/2 tsp salt
1 tsp sugar
2 tbsp olive oil
325ml lukewarm water
flour for dusting

First sieve your flour and salt into a large mixing bowl or the bowl of your mixer and stir to combine.

In a jug whisk together the water, yeast, sugar and olive oil then slowly add to the flour and salt. I used an electric mixer to start it off, for about 5 minutes, on a low speed then kneaded it by hand on a floured work surface for about another 5 minutes (just cos like the feel of the dough) but you can just use the mixer if you like.

Once the dough is nice and springy shape into a round then pop in a bowl and sprinkle with flour. Leave in a warm spot covered with a damp tea towel for 1 hour.

On a floured work surface knock back the dough - this is to get rid of the air that has built up - so you do this by kneading it again for a couple of minutes. Shape the dough into whatever shape you want again - I went with a standard oval then leave on a floured baking tray under a clean tea towel for another hour and a half to prove again.

20 minutes to the end preheat your oven to 220°C and but a baking tray in the bottom of the oven to heat up.

Once the dough is ready to be baked remove the tea towel and slash the top of the loaf with a sharp knife. Dust with flour then put in the middle shelf of the oven. Throw a handful of ice cubes into the heated baking tray to create lots of steam to give the bread a nice crust. Bake for 25 minutes on 220 C then reduce the heat to 200 C for a further 10 minutes.

Remove from oven and put on a cooling rack. I have to have a slice when its still warm with butter. Nothing better.


Tuesday, 16 April 2013

Brown Ale Bread for the Grand National

Being a big fan of real ale I find the idea of using it in my cooking somewhat romantic and last weekend I began trying out a few recipes using beer as an ingredient. Friday night was Porter Braised Seasoned Ribs (recipe to be uploaded) and on Saturday I made Brown Ale Bread and Porter Cajun Pulled Pork, I'm afraid not together though. I will write up the pulled pork soon - unfortunately its not as photogenic as I'd like and it definitely tastes better than it looks in photos. I will upload my efforts nonetheless. I actually used the porter infused meat juices from Friday night's ribs to cook the pulled pork which only enhanced the flavour even more and it turned out to be one of the best things I've ever cooked! Seriously you need to try this and if I ever do open my own cafe this is definitely going on the menu. Anyway back to the bread...

We had the brown ale bread with a couple of nice cheeses, chutneys and a glass of nice cold beer whilst watching the Grand National. It is one of the rare occasions when I have have a little flutter and my horse came a respectable 3rd (Tea For Three). This is the first time I've made this particular bread - I'm trying to notch up my bread conquests this year - and I did find the bread was a little difficult to slice as it was quite a crusty loaf (hence why we didn't have it with the pulled pork and opted for some nice floury baps instead). I'd say it is more of a tearing bread - great for dunking in soup and stews - but was also delightful with butter, cheese and chutney!


 Ingredients
(makes 1 hearty loaf)
500g wholemeal flour
500g plain flour
2 packets 7g dried yeast
625ml brown ale (I used Newcastle Brown but you can use any you like)
pinch of salt
1 tbsp treacle
2 tbsp olive oil

First you need to warm the beer a bit so its lukewarm then divide it by 2 and add the yeast to one and the treacle to the other. Stir in then leave to stand for 5 minutes.

Combine the flours and salt then slowly add the 2 quantities of ale, mixing as you do so(mine seemed quite dry so I added a bit more ale so it stuck together better). Knead the dough for about 10 minutes until it comes together and is fairly smooth. Then form into a ball.

Put in a bowl and cover with clingfilm and a tea towel then leave in a warm spot for an hour.

After 45 minutes preheat the oven to 225°C, heating the tray you are going to bake it on.

Once your hour rising time is up knead the dough lightly and form into an oval shape. Flour the baking tray then place on the dough. Slash the top with a sharp knife and dust with flour then bake for about 30 minutes or until it sounds hollow when tapped on the bottom. If you throw a handful of ice cubes into the bottom of the oven it helps it form a nice crust (top tip!)

Remove from the oven and cool for 5 minutes before enjoying with a selection of cheeses, chutneys and a nice glass of ale (or whatever you fancy really). Enjoy!