Saturday, 31 August 2013

Mega Cheese and Bacon Skillet Scone

Really into my breads at the moment, in fact as I'm writing this recipe up I have some dough rising on the side and some garlic roasting in the oven for a (hopefully) lovely garlic and rosemary bread. This mega scone I can confirm was a lovely bread. It was really easy to make too and you don't even have to leave it to prove, literally just bash it together, stick it in the oven and bam ready. Ideal if you're short of time and all the ingredients are the kind of stuff likely to already be knocking about the kitchen. I just made this one weeknight and we had it with a couple of tins of tomato soup; dead easy and tasty (especially when eaten whilst still warm).


Ingredients
200g self raising flour
1 tsp baking powder
40g butter, cut into cubes
1 packet smoked bacon lardons (about 180g-200g)
1/2 tsp cayenne pepper
100g mature cheddar, grated, or any cheese of your choice (this is for quite a cheesy scone - just decrease the amount if you don't want it so cheesy)
about 100ml milk

First fry off your bacon until it is nice and cripsy then put aside on some kitchen roll to drain the fat from them.

Preheat your oven to 220°C and lightly oil an 8 inch skillet pan (don't worry if you dont have one you can use a cake tin or a casserole dish or even just a baking tray - I just like skillets and this creates a nice crust).

In a bowl mix together the flour, baking powder and cayenne pepper then add the butter cubes and rub in to the flour using the tips of your fingers (like you're making pastry) until you have no lumps of butter. Mix in the grated cheese and bacon bits then add a bit of milk, adding a little more until it comes together into a ball.

Knead a couple of times - you just want it to form a rough ball, don't be tempted to knead it loads as this will give the scone a tough texture.

Place the dough into the oiled pan and put a cross in the top by pushing the handle of a wooden spoon firmly through the dough (this makes it easier to break up later) then sprinkle with a little more cheese and some cracked black pepper and bake in the oven for about 35 minutes.

If it looks like it is browning too much turn the oven down to 200°C for the rest of the time.

Check it by tapping the bottom and if it sound hollow then its done! This goes really well with soups and stews as it has that kind of dumpling texture or just by itself with a bit of butter.


Monday, 19 August 2013

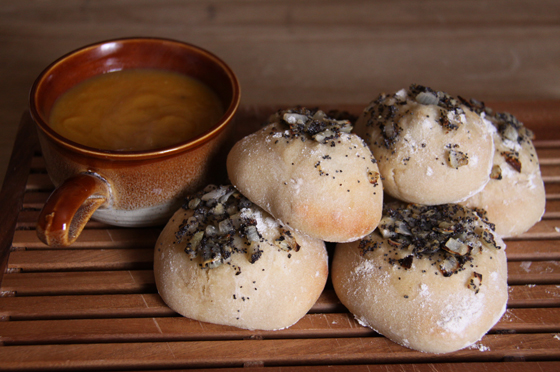
Freshly baked Bialys

These have been a favourite of ours ever since I made them a few months back and despite the 4 hour preparation time they are definitely worth the effort! There is nothing better than these little babies straight from the oven and accompanied by some homemade soup they are an absolute delight!


The Bialy is very similar in texture to the bagel - soft and chewy - however being baked only and not boiled prior to baking they have a much softer crust than that of their bagel brother. I had never heard of the Bialy before and came upon the recipe on the Smitten Kitchen blog (one of my blog obsessions). I was instantly like 'I have to make these', and from the photographs alone I was salivating. I often wish that we had more of a bakery culture in Manchester (and I cannot count Greggs as an authentic bakery); other cities seem to be spoilt with baked goodness but I must get my kicks by recreating such things in my own kitchen. There is one traditional Jewish bakery in Cheetham Hill I have been to which is the only one that has come close to my expectations and I was like a child in a sweet shop, greedily wanting to buy everything! In the end I settled for a seed topped Challah bread and a selection of bagels. This was not enough.

So I have made these about 4 or 5 times since discovering them and I am still trying to perfect the shape - mine always rise too much compared with the lovely Deb's. I think it is the shaping - I need to thin out the centres more so the onion filling is not pushed out when they are baked. I believe perseverance is the key and if I make these enough times I will master the art - you gotta have a dream! So here's how you make them...

Ingredients
(makes 6)
300g strong white bread flour
1/2 tsp fast action dried yeast
1 tsp sea salt
175ml water, at room temperature

1/2 small onion, chopped
1 tbsp poppy seeds
Olive oil
Salt & pepper

In a mixing bowl or bowl of an electric mixer add the flour and then the yeast to one side and the salt to the other so they are not touching (the salt will kill the yeast). Using the dough hook mix on a low speed and slowly add the water to form a soft dough. Turn up to a medium speed and mix for about 7 minutes. If you are doing this by hand you will probably need to double this time.

Cover the dough and leave to rise in a warm place for about an hour and a half to 2 hours. Because of the low yeast content it needs longer than other breads to rise but this is what gives it the dense chewy texture.

Deflate the dough by pressing down then transfer to a floured work surface and cut into 6 equal pieces. Shape the pieces by pressing your thumbs into the centre and turning round in your hands. Fold the edges in to the well made by your thumbs to make a kind of pouch then place (pinch side down) on a floured baking tray. Cover and allow to rise for another 2 hours.

30 minutes before that time is up preheat your oven to 250°C or as high as it will go.

To make the onion filling heat the olive oil and fry the chopped onion on a medium heat until soft and translucent (between 5 and 10 minutes). Add the poppy seeds and a good few twists of sat and pepper - taste and adjust to your liking. Allow to cool a little.

Take each dough ball at a time and make a firm indent in the centre - working the dough to flatten it out making a kind of spaceship shape. Add a spoonful of the onion into each well and lightly press down. Sprinkle with flour and bake for 6-10 minutes until mottled golden brown. Allow to cool for a couple of minutes until just warm then enjoy the baked goodness!


Sunday, 11 August 2013

Pumpkin cupcakes with cream cheese frosting and toasted almonds

I see a lot of sweet recipes using pumpkin and I've always wanted to give it a go myself. I remember last Autumn becoming pretty addicted to Pumpking beer, a beer brewed from pumpkin and I made spicy pumpkin soup from the flesh removed when we carved one at Halloween but that's as far as my experience goes. This year I am attempting to grow my own for Halloween and the plant is doing quite well thus far so fingers crossed on that one! So this recipe uses tinned pumpkin (I used Libby's) which is kind of like a puree which you add to the cake mixture which gives it a richer, denser taste and texture than a regular sponge - without being too heavy that is. I think using pumpkin in sweet recipes is definitely an American thing and I did worry a little that they might turn out really sweet and sickly but they were not at all - the spices make them quite similar to a ginger cake and I think these will be perfect comfort food as the weather gets colder. You do not really see tinned pumpkin all that much in the UK but Aldi are selling it at the moment so I stocked up as I have always wanted to use it - I will have to go back and get some more whilst they still have it now I know it is a success!


I added the toasted almonds myself as I had some flaked almonds in the cupboard so I just spread them out on greaseproof paper on a baking tray, sprinkled them with brown sugar and toasted in the oven at 180°C for about 8 minutes (they smell amazing). You can add whatever you fancy to the top though - nuts, bits of toffee, chocolate drops, coloured sprinkles, or one of my favourites, peanut M&M's.

Ingredients
(makes 12-14)
200g self raising flour
1 tsp bicarbonate of soda
1/2 tsp salt
1 tsp cinnamon
1/2 tsp all spice
1/2 tsp ground ginger
110g butter (at room temperature)
2 eggs
200g white sugar
1 tsp vanilla extract
1 tin canned pumpkin puree (I used Libby's)

For the cream cheese frosting:
120g cream cheese
30g butter (at room temperature)
220g icing sugar
1/2 tsp vanilla extract

First preheat your oven to 175°C and line your baking tin with muffin cases - start with 12 and see if you need any more.

Beat together the butter and sugar until fluffy. Add the eggs one at a time and beat in well. Add the vanilla extract and mix.

Scrape down the sides of the bowl then add the pumpkin puree, mixing until roughly combined.

Sift in the flour, spices, bicarbonate of soda and salt a bit at a time, mixing together until thoroughy combined - try not to be too rough as you don't want all the air to be beaten out.

Fill the muffin cases with the mixture so they are almost to the top - an ice cream scoop is really handy for doing this. Use more muffin cases if you need to. Bake for 18-20 minutes or until a skewer comes out clean when inserted.

Allow to cool completely on a wire rack before adding the frosting.

So for the frosting beat together the cream cheese and butter (an electric mixer makes this really easy) until it is smooth with no lumps. Add the vanilla extract and mix in.

Sift in the icing sugar about a 3rd at a time and mix in well, each time scraping round the sides to make sure it is all mixed in. Now here is where you need to use your judgement as I always find no matter which recipe I use I always have to add more icing sugar as the mixture seems to runny. I have upped the quantity from the recipe I used but you still may need to add more. The mixture needs to be able to stay on top of the cupcakes and not run off. I also try to leave the frosting in the fridge to set for a couple of hours if I can.

Spread the mixture on the top using a wide knife and top with whatever you fancy - in my case toasted almonds. Pumpkin in cake. Success.


Saturday, 27 July 2013

Bourban spiced apple pie

Everybody loves apple pie. Fact. It's a classic. With ice cream, with custard, with cream or clotted cream, any day, and time of the year. I love apple pie. I also love bourbon and this recipe combines two of said favourite things to create the mother of apple pies. It is a match made in heaven as the bourbon adds a caramel, oaky taste which compliments the apples and cinnamon spices excellently. We ate this warm from the oven with some posh vanilla ice cream and a bottle of real ale each - I recommend a tawny bitter sweet beer with this, something which is described as 'caramel' or 'toffee' flavours, well that's what I drank and it was delightful (a Caledonian 80/- to be precise). So without further a-do here's how to make it...


Ingredients 
for pastry:
200g plain flour
2 tbsp icing sugar
110g cold butter, cubed
3 tbsp cold water

3 tart apples (I used Granny Smiths), peeled and thinly sliced
120ml milk
2 tbsp bourbon (I used Gentleman Jack but normal Jack Daniels or Jim Bean or any other bourbon is fine)
125g brown sugar
1 tbsp cornflour
1 tsp cinnamon
1 egg, beaten

So to make the sweet short crust pastry, sieve the flour and icing sugar into a bowl then rub in the cubed butter using just your fingertips until you have a fine breadcrumb (if you have warm hands try running them under the cold water for a bit then drying them off first as this will help to stop the butter melting and it getting too sticky). Add the water and mix in with a knife until it comes together then mould into a ball, wrap in cling film and put in the fridge for about 20-30 minutes.

Meanwhile preheat your oven to 190°C. Mix together the milk, bourbon, cornflour, brown sugar and cinnamon and whisk with a fork then add the sliced apples to marinate.

Roll out about two thirds of the pastry on a cold, well floured work surface (flouring the rolling pin too) and line the base of your pie dish - I used a smallish deep pie dish (about 9 inches). Fill with the apples and sauce then roll out the rest of the pastry for the lid. Carefully place on top and trim the sides with a knife. Crimp the edges and decorate with any spare pastry if you so wish - I just can't help myself! Brush with the beaten egg wash and make a couple of holes in the top to let the steam out then bake for about 45 minutes.

Serve with ice cream, cream or custard and enjoy - proper comfort food!


Sunday, 21 July 2013

Carrot cupcakes for a summer BBQ

It has been a lovely sunny weekend and yesterday was my mother's annual family barbecue get-together. I wanted to contribute to the food as everyone was bringing something so I decided to make these delicious carrot cupcakes. I did want to make the little marzipan carrots to decorate the top but I couldn't find orange food colouring in any of the supermarkets (come on guys get it together!) Instead I just used these cute little multicoloured chocolate beans which all the kids loved so it turned out ok I guess. I'm pretty sure these tasted good as they were all gone in about 5 minutes so I must have done something right! The recipe is a different one to the one I usually use for making a full size carrot cake and uses grated apple as well as carrot so you get a really nice moist cake. With it being so warm yesterday I pre-made the cream cheese frosting and kept it in the fridge until they were needed otherwise I would've just ended up with a runny sloppy mess and nobody wants to eat that! I made a big batch of these and doubled up this recipe (which made about 32) but if you just want to try this recipe out this makes about 12-15.


Ingredients
(makes 12-15)
2 large carrots, grated
1 large apple, grated (skin on is fine)
175g self raising flour
1 tsp bicarbonate of soda
Pinch of salt
1 tsp cinnamon
1/2 tsp nutmeg
50g chopped walnuts
125g white granulated sugar
2 eggs, beaten
160ml sunflower or vegetable oil
1/2 tsp vanilla essence
Zest of 1/2 orange

For the cream cheese frosting:
40g butter (at room temperature)
100g cream cheese (at room temperature)
250g+ icing sugar
1 tsp vanilla essence

First of all pre-heat your oven to 180°C and put your cupcake cases into a baking tin.

Sift the flour into a large mixing bowl and mix in the bicarbonate of soda, salt, cinnamon, nutmeg, sugar and chopped walnuts.

Make a well in the centre and add the beaten egg, oil and vanilla essence and mix until thoroughly combined. Add the orange zest, grated carrots and apple and fold into the mixture. It should be quite sloppy.

Divide the mixture into the cupcake cases (about 3/4 full) then bake for about 18-20 minutes depending on your oven - check earlier if they are looking too brown as all ovens are different. They are ready when a skewer comes out clean. Leave to cool completely on a cooling rack.

Don't try to add the frosting until the cakes are fully cooled as you will just end up with a runny mess - believe me! I find it is best to make the cream cheese frosting and leave it in the fridge for as long as you can - overnight if possible so it can set. It would be a good idea to make this first before you make the cakes so it can be setting whilst you are doing the rest. It is also important that you leave the butter and cream cheese out of the fridge for a while before you make this as they mix together much better at room temperature and you do no get little lumps of butter that has not mixed in properly which can happen if the butter is too cold.

So to make the vanilla cream cheese frosting you mix together the butter and cream cheese - I use an electric mixer as it is quite hard work by hand and if you mix on the top setting it makes the mixture nice and smooth. If you don't have one it is fine to do by hand - you just need to make sure there are no lumps in it. Now sift in the icing sugar and mix in. This bit is kind of a judgement call as I always find no matter what recipe you use for cream cheese frosting it is always too runny and I end up having to add loads more icing sugar than it says. So you just have to keep testing it and sifting in a bit more icing sugar at a time until you are happy with the consistency - it needs to be able to stay on top of the cakes and not run off. Finally stir in the vanilla essence then transfer to a container and leave in the fridge to set.

Use a butter knife to spread the frosting on top of the cupcakes and decorate with whatever you fancy. These will be the best carrot cupcakes you will ever eat! 


Sunday, 14 July 2013

Poppy seed and mozzarella twist bread

Another weekend, another bread. I am really getting in to this bread baking malarkey now and I'm loving trying different flavours to see what works together. This week I decided to do another twisted crown bread, a bit like the Italian Brioche Couronne one, but this time using poppy seeds and stringy buffalo mozzarella cheese and it turned out really well. The poppy seeds have a nice nutty taste and the mozzarella goes nice and gooey if you eat it when it is still warm then a bit of added parmesan bumps up the cheesiness. I think I could have added some slow fried red onions as well to this one so I might try that the next time... This bread is pretty easy to make and you don't have to wait hours for it to prove (a mere half an hour my friend!) so its a good one if you are a bit tight on time. It is also made with stuff you may already have in the cupboard, aside from the mozzarella, and the ingredients are all cheap to buy so its a good one if you're a bit short of cash.


We ate ours with some nice Thai spice marinated salmon and salad grown by yours truly - pretty proud of my first veg growing attempts actually and I've taken a few pics of the garden. I say garden its more of a yard or 'courtyard garden' as I like to say. When we first moved here I was a bit dubious of how much I would be able to grow there but I think what I have planted has done really well so far - I'm still waiting to see how my Jack Lantern pumpkin, carrots and climbing beans do through the summer so we'll have to see!

Ingredients
500g strong white bread flour
100g wholemeal flour
Pinch salt
7g packet fast action dried yeast
2 tbsp honey
350ml lukewarm water
Olive oil
About 3-4 tbsp poppy seeds
2 balls buffalo mozzarella
Parmesan cheese 

Mix the 2 flours, the yeast and the salt together in a large mixing bowl or the bowl of an electric mixer. Add the water and mix together until you get a rough dough. Push a dent into the centre of the dough and add the honey into it then fold the dough in onto the honey. Knead for about 10 minutes on a floured work surface or 5 minutes with the dough hook on an electric mixer. The dough is ready when it springs back if you prod it with your finger.

On a clean floured work surface roll the dough out into a flat long rectangle (about 40cm by 20-25cm though it doesn't need to be exact) so the long side is towards you. Brush the top with olive oil then evenly sprinkle over the poppy seeds. Tear up the mozzarella and dot the pieces across the dough. Grate some parmesan over that then roll the dough up towards you, trying to keep it tight, to make a long sausage. 

Squash the sausage down slightly then cut in half lengthways. Turn so the open filling is facing upwards then twist the two pieces together - turn one hand clockwise, the other anti-clockwise. Try to do this quite quickly as dawdling may cause the filling to fall out! Join the 2 ends and squash  together to create a ring.

Lightly oil a baking tray then transfer the dough ring to that. Now brush or spray the top of the dough with olive oil and cover with cling film and a tea towel. Leave somewhere warm to rise for 30 minutes. Now set the oven to preheat at 200°C. Put a deep baking tray in the bottom of the oven to heat up - you add a cup of water to this when the bread goes in the oven to create steam to give it a nice crust and help it to rise.

Uncover the bread and sprinkle with some more poppy seeds and some grated parmesan then put in the oven for about 30 minutes (don't forget to add a cup of cold water or a handful of ice cubes to the tray in the bottom for steam). After the 30 minutes tap the bread on the bottom and if it sounds hollow it is ready.

I think this bread would be really nice with some homemade soup - might have to make it again if my pumpkins are a success!


Baby radishes.


Spinach, beetroot and radishes.


Mixed salad leaves.


Pumpkin.


Grape vine.


Rhubarb, mint (for mojitos) and strawberries.


Saturday, 13 July 2013

Baked eggs with bacon bits

This is one of our favourite breakfasts - first seen (by me) on the lovely Rachel Khoo's Little Paris Kitchen however I always cook some lardons so they are nice and crispy and use them instead of the fish roe which she uses (not sure about that first thing in the morning...) She calls them 'oeufs en cocotte' which is obviously the french name for them but the good thing about this is you can add anything. I have seen quite a few variations of this done with different cheeses, ham, spring onions, mushrooms and other ingredients so you could just stick in anything you fancy which you have knocking about in the fridge. You don't have to cook these in tea cups I just think it looks cute and they are the perfect size for individual portions but ramekins are also fine. These are really easy to make and are very tasty - the perfect alternative to a full english and once you've made them once I can assure you they will become a breakfast favourite!


Ingredients
(for 2)
180g bacon lardons or pancetta
2 large eggs
Small pot crème fraîche
Salt & pepper
Fresh chopped parsley
Fresh crusty bread

First preheat your oven to 170°C.

Fry off your lardons until they are golden and crispy then transfer to some kitchen roll to absorb the excess fat.

In your teacups or ramekins put 2 tbsp crème fraîche in each then a twist of salt and pepper and sprinkle some of the lardons on top. Add another tablespoon of crème fraîche, then a few more lardons and then crack your egg on top of that. Add yet another spoon of crème fraîche, a few more lardons and a twist of salt and pepper, so you are layering up the ingredients.

Place in a bain-marie so the eggs cook more evenly and put in the preheated oven for about 8-10 minutes. The eggs should be set on top but still have a runny yoke. sprinkle on the chopped parsley and eat with fresh crusty bread. Delightful.